 English
 Español
 Français
 русский
 عربى
عربىBest Momo Maker Machines: A Comprehensive Guide
Content
- 1 Understanding Momos and Their Growing Popularity
- 2 Purpose and Function of a Momo Maker Machine
- 3 Key Benefits of Using a Momo Maker Machine
- 4 Manual Momo Makers: Traditional Operation and Practical Use
- 5 Electric Momo Makers: Efficient and User-Friendly Options
- 6 Automatic Momo Makers: High-Volume and Commercial Solutions
- 7 Comparison of Momo Maker Machines
- 8 Material Quality and Durability
- 9 Ease of Operation and Cleaning
- 10 Capacity and Size Selection
- 11 Price Range and Warranty Coverage
- 12 Compatibility with Different Momo Types
- 13 Step-by-Step Guide for Manual Momo Makers
- 14 Step-by-Step Guide for Electric and Automatic Momo Makers
- 15 Expert Tips for Best Results
- 16 Recommended Quantities and Settings
- 17 Essential Ingredients
- 18 Preparing the Dough
- 19 Preparing the Filling
- 20 Filling and Portioning Guidelines
- 21 Cleaning Methods for Different Machine Types
- 22 Maintenance Practices to Extend Machine Lifespan
Understanding Momos and Their Growing Popularity
Momos are a type of dumpling originating from Tibet and Nepal that have gained immense popularity across South Asia and beyond. They are typically made with a thin dough wrapper filled with meat, vegetables, or a combination of both. Momos are often steamed, fried, or pan-fried, and served with a variety of sauces. Their widespread appeal is due to their versatility, flavorful fillings, and convenient portion size, making them suitable for street food, home cooking, and restaurant menus.
The popularity of momos has surged in urban areas where fast, tasty, and affordable meals are in demand. Cafes, restaurants, and street vendors have adapted momos to local tastes, including vegetarian, vegan, and fusion variations. This growing demand has created a need for efficient preparation methods, leading to the development of specialized momo maker machines.
Purpose and Function of a Momo Maker Machine
A momo maker machine is designed to streamline the process of making momos by automating or simplifying key steps such as dough pressing, filling, shaping, and sealing. These machines ensure that each momo is uniform in size and shape, which is particularly beneficial for commercial kitchens or busy home cooks who want consistency without manual effort.
Depending on the type, a momo maker machine can perform one or more of the following functions:
- Pressing and rolling dough into perfectly round wrappers.
- Dispensing precise amounts of filling for uniform taste.
- Sealing and shaping momos to maintain structural integrity during cooking.
- Reducing preparation time while maintaining hygiene standards.
Key Benefits of Using a Momo Maker Machine
Using a momo maker machine provides multiple advantages for both home cooks and professional kitchens. These machines reduce manual labor, enhance consistency, and improve productivity. Whether preparing a small batch or a large quantity, they ensure that each momo maintains the same size, shape, and quality.
The main benefits include:
- Time-saving: Machines can produce dozens of momos in minutes, significantly faster than hand-making each one.
- Consistent quality: Uniform shapes and sizes ensure even cooking and professional presentation.
- Ease of use: Simple operation allows cooks of any skill level to create high-quality momos.
- Hygiene and efficiency: Reduced hand contact with the dough and filling improves cleanliness and reduces kitchen mess.
Manual Momo Makers: Traditional Operation and Practical Use
Manual momo makers are simple devices designed to shape and seal momos by hand. They typically consist of a base mold, a press or plunger, and interchangeable plates for different momo sizes. Users place the dough and filling on the mold, then press it to form perfectly shaped momos.
Advantages of Manual Momo Makers
- Low cost compared to electric and automatic machines.
- Compact and easy to store in small kitchens.
- No electricity required, making it usable anywhere.
- Provides control over the amount of filling in each momo.
Limitations of Manual Momo Makers
- Slower production, suitable for small batches only.
- Requires consistent manual effort, which can be tiring.
- Shaping may be less uniform compared to automated machines.
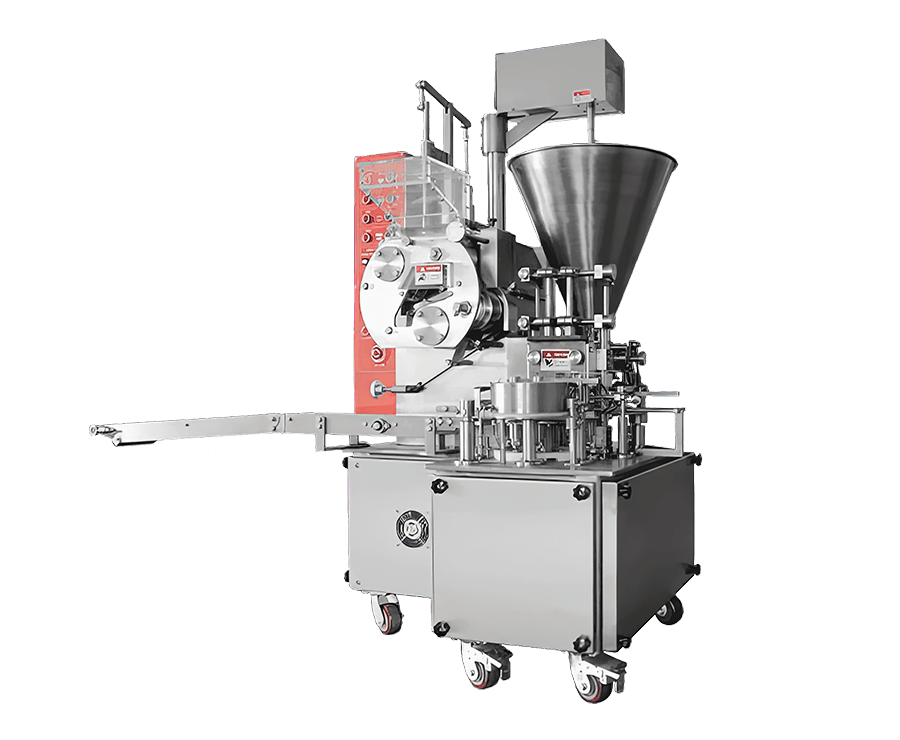
Electric Momo Makers: Efficient and User-Friendly Options
Electric momo makers combine mechanical operation with electricity to automate the pressing and shaping process. They often include adjustable settings for dough thickness, filling quantity, and momo size. These machines are ideal for home users who want faster results without compromising on consistency.
Advantages of Electric Momo Makers
- Faster production than manual models, suitable for medium-sized batches.
- Consistent shaping ensures uniform appearance of momos.
- Less physical effort is required compared to manual pressing.
- Adjustable settings allow for customization of momo size and thickness.
Limitations of Electric Momo Makers
- Higher cost than manual machines.
- Requires electricity, which limits portability.
- Cleaning can be more complex due to electrical components.
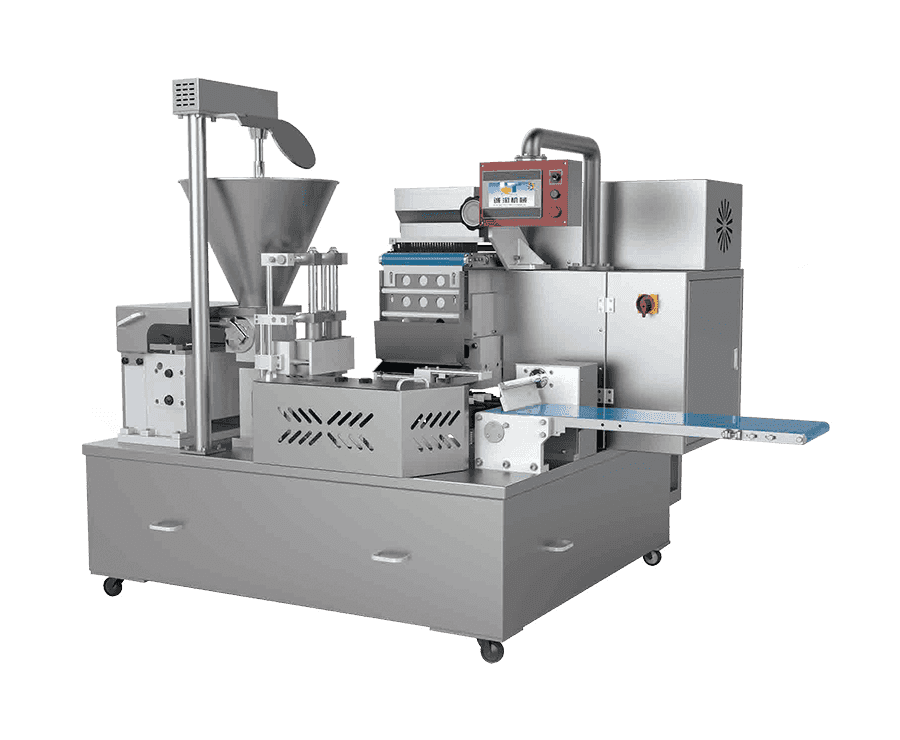
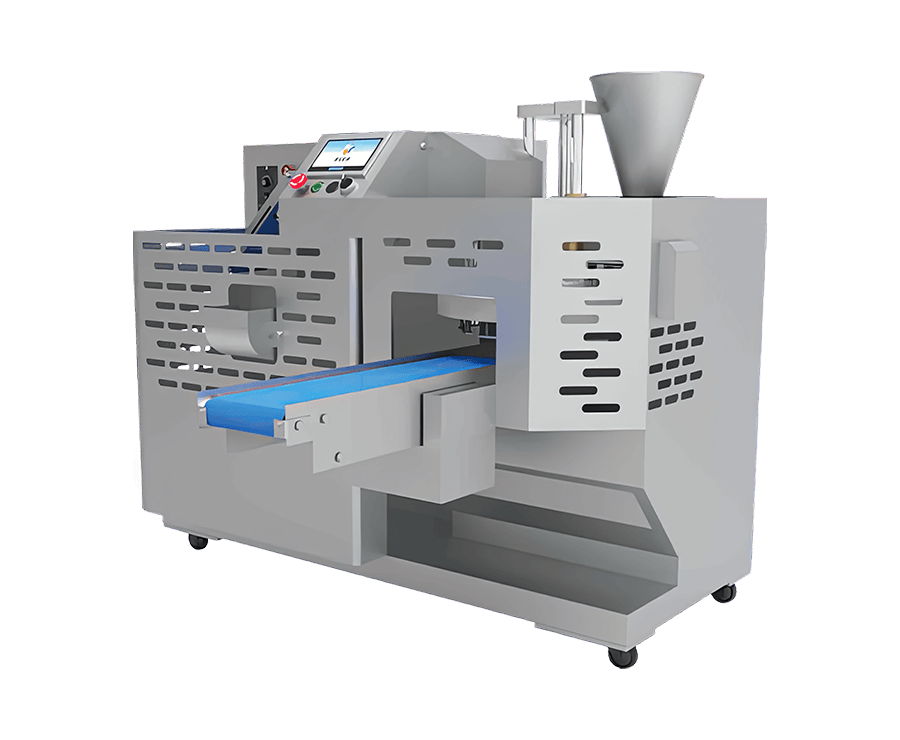
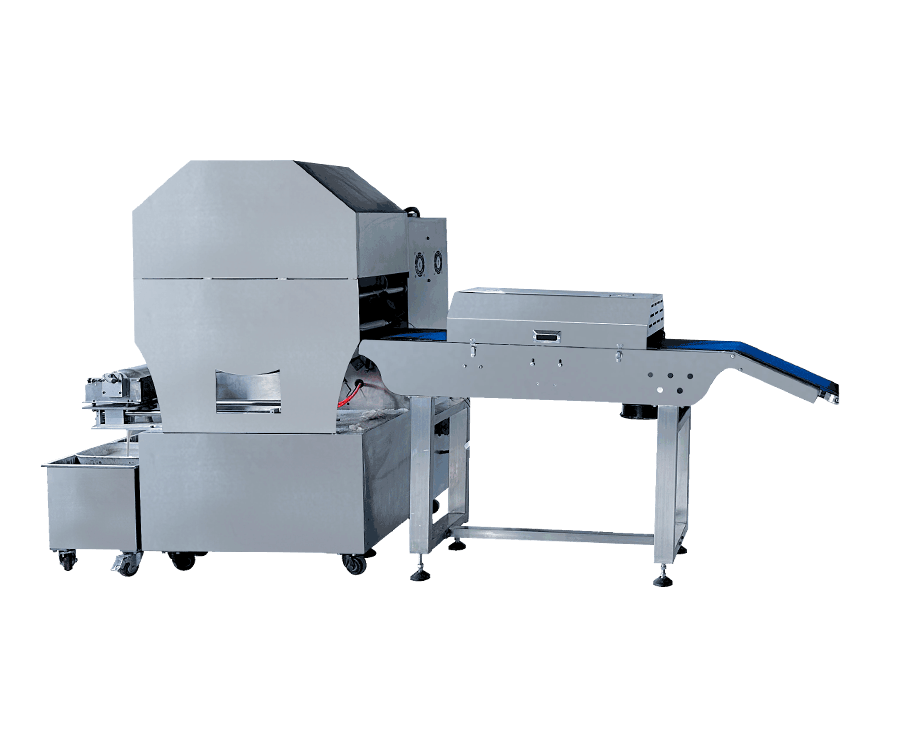
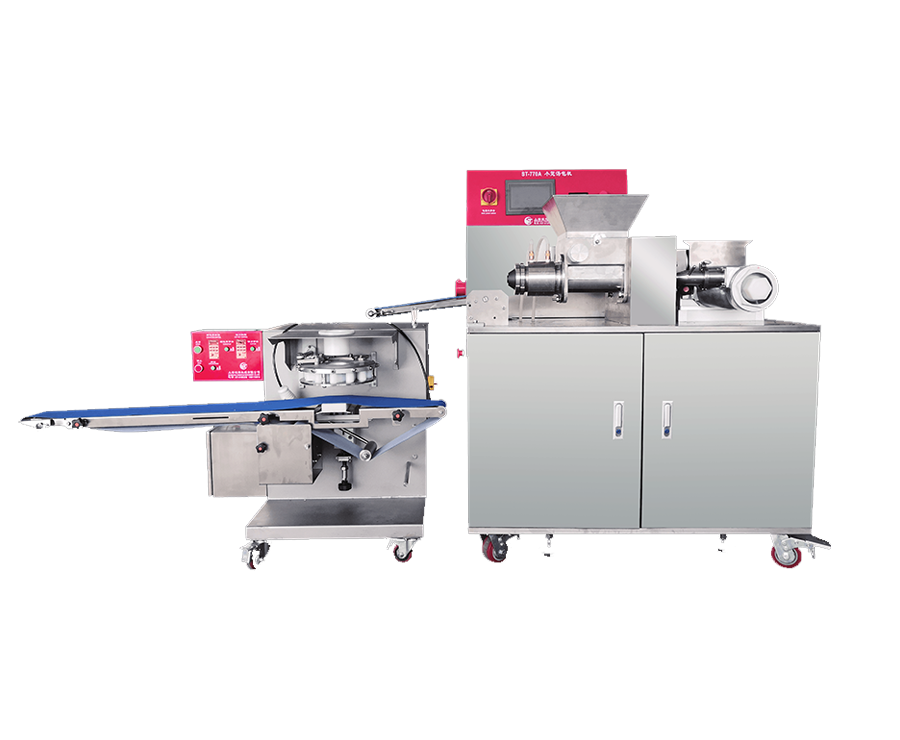
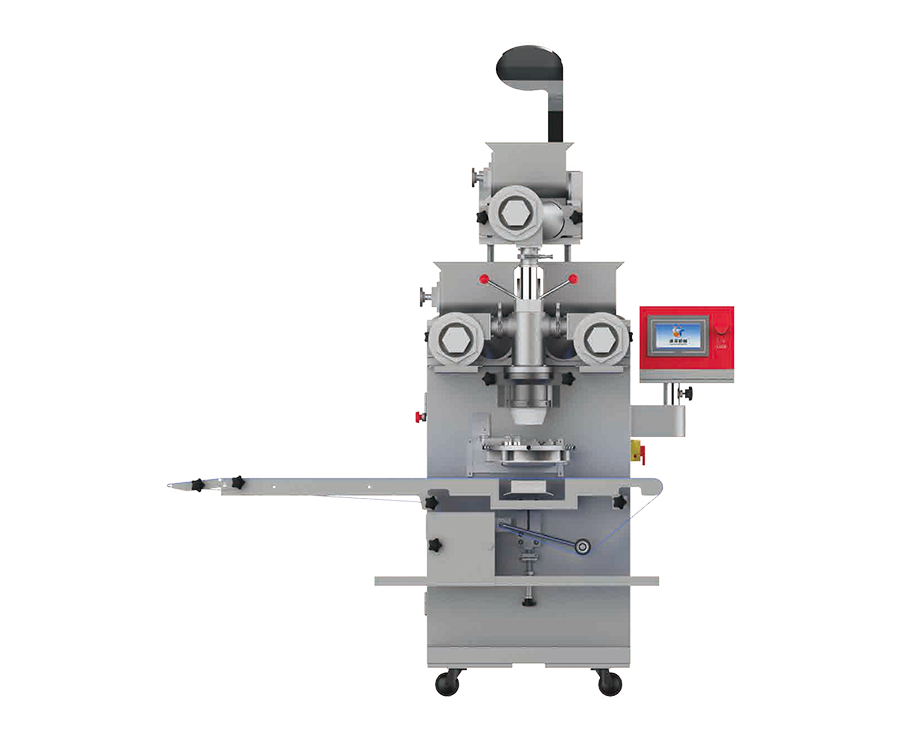
Automatic Momo Makers: High-Volume and Commercial Solutions
Automatic momo makers are fully mechanized machines designed for large-scale production. They automate dough feeding, filling distribution, shaping, and sometimes even steaming. These machines are widely used in commercial kitchens, restaurants, and food production facilities where high output and uniformity are critical.
Advantages of Automatic Momo Makers
- Extremely high production capacity suitable for commercial use.
- Consistently shaped momos with precise filling amounts.
- Reduces manual labor, increasing efficiency and speed.
- Some models integrate with other kitchen equipment for a complete production line.
Limitations of Automatic Momo Makers
- High initial investment compared to manual and electric machines.
- Larger footprint requires more kitchen space.
- Complex maintenance and repair requirements due to multiple moving parts.
Comparison of Momo Maker Machines
| Type | Production Speed | Ease of Use | Cost | Best For |
| Manual | Slow | Easy | Low | Home use, small batches |
| Electric | Medium | Moderate | Medium | Home use, medium batches |
| Automatic | Fast | Complex | High | Commercial production |
Material Quality and Durability
The construction material of a momo maker machine greatly affects its longevity and performance. Stainless steel is the most common choice, as it is rust-resistant, strong, and easy to clean. Aluminum machines are lightweight and heat-conductive, making them ideal for fast cooking, but they may wear out faster if not properly maintained. Plastic components are usually found in manual or small-scale models; they are budget-friendly but less durable. Always check for high-quality finishes and reinforced parts that can withstand repeated pressing or shaping without deforming.
Ease of Operation and Cleaning
A user-friendly momo maker should allow effortless assembly, filling, shaping, and cleaning. Manual machines with removable molds make cleaning easier, while electric and automatic machines should have detachable trays and components to prevent food buildup. Smooth, non-stick surfaces reduce sticking and ensure consistent results. Avoid machines with many hard-to-reach corners, as these increase cleaning time and maintenance effort.
Capacity and Size Selection
Selecting the right capacity depends on your production needs. Home users may prefer machines that make 4–12 momos at a time, while commercial kitchens might require models capable of producing 50–100 momos per batch. Consider the machine's footprint; larger machines can take up significant counter space, whereas compact models are suitable for small kitchens. Check the maximum filling volume per mold, as it affects the size and plumpness of each momo.
Price Range and Warranty Coverage
Momo maker machines are available across a wide price range, reflecting their type, materials, and features. Manual machines are usually the most affordable, while electric and automatic models can be significantly more expensive. Always consider the warranty period; reputable manufacturers often provide 1–3 years of coverage, including repairs or replacements for defective parts. Investing slightly more in a durable machine with warranty protection can save costs in the long run.
Compatibility with Different Momo Types
Not all momo makers can produce every shape or size of momo. Some machines are designed for traditional round momos, while others can form pleated, half-moon, or even decorative patterns. Consider your menu or preference and choose a machine that accommodates the desired variety. Additionally, some models allow adjustable thickness and filling volume, enabling more control over cooking consistency and portion sizes.
Comparison of Momo Maker Features by Type
| Feature | Manual | Electric | Automatic |
| Ease of Use | Moderate | Easy | Very Easy |
| Production Capacity | Low | Medium | High |
| Price | Low | Medium | High |
| Shape Variety | Limited | Moderate | Wide |
Step-by-Step Guide for Manual Momo Makers
Using a manual momo maker requires careful preparation and precise handling to ensure each momo is uniform and well-sealed. Start by assembling the machine according to the manufacturer’s instructions, ensuring that the pressing plates and molds are clean and properly aligned.
Next, roll out the dough to the required thickness and cut it into pieces that fit the molds of your manual momo maker. Place each dough piece into the mold and add an appropriate amount of filling, taking care not to overfill, which can cause leakage during cooking.
Finally, close the mold and press firmly to shape and seal the momo. Gently remove the finished momo and place it on a tray lined with parchment paper or a lightly floured surface. Repeat the process until all dough and filling are used.
Step-by-Step Guide for Electric and Automatic Momo Makers
Electric and automatic momo makers simplify the process, but proper setup is critical. Begin by plugging in the machine and preheating it if required. Check that all removable parts, such as trays or molds, are securely in place and clean.
Load the dough and filling according to the manufacturer’s instructions. Many automatic machines have specific compartments for dough and filling; ensure you follow the recommended quantities to avoid jams or uneven shaping.
Once the machine starts operating, monitor the first few momos to ensure proper sealing and shape. Adjust pressure, speed, or filling quantity if needed. After the batch is complete, carefully remove the momos and prepare the machine for cleaning as per the instructions.
Expert Tips for Best Results
Dough Consistency
Use slightly soft but firm dough that holds shape without sticking to the mold. Knead thoroughly and rest for at least 20 minutes to improve elasticity and prevent tearing during shaping.
Filling Preparation
Ensure the filling is not too watery to avoid leakage. Chop vegetables finely and cook meat fillings lightly to reduce moisture. Season properly to enhance flavor while the momo cooks.
Sealing Techniques
For manual momo makers, press firmly but evenly to ensure a complete seal. For automatic machines, adjust filling quantity and monitor the first few momos to perfect the seal and shape.
Cooking and Serving
Steam momos on a lightly oiled tray to prevent sticking. Cooking time varies based on size and filling, generally 10–15 minutes. Serve hot with dipping sauces to maintain texture and flavor.
Troubleshooting Common Issues
- Sticky dough: Lightly flour molds or reduce moisture in dough.
- Filling leakage: Reduce filling moisture and avoid overfilling.
- Uneven shaping: Check mold alignment or adjust dough thickness.
- Machine jamming (electric/automatic): Ensure proper loading and do not exceed recommended quantities.
Recommended Quantities and Settings
| Momo Size | Dough per Piece (g) | Filling per Piece (g) | Steam Time (min) |
| Small | 20 | 15 | 10 |
| Medium | 30 | 20 | 12 |
| Large | 40 | 30 | 15 |
Essential Ingredients
Preparing perfect momos requires fresh, high-quality ingredients. The dough and fillings need to be carefully measured to ensure consistent taste and texture. Below is a breakdown of essential ingredients for both vegetarian and non-vegetarian momos.
- Dough: All-purpose flour, water, a pinch of salt, and optional oil for smooth texture.
- Vegetarian filling: Cabbage, carrots, onions, garlic, ginger, soy sauce, and optional mushrooms.
- Non-vegetarian filling: Minced chicken, pork, or beef, combined with onions, garlic, ginger, soy sauce, and seasoning.
- Seasonings: Salt, black pepper, soy sauce, and optional chili for extra flavor.
- Oil or butter: For greasing the momo maker or preventing sticking.
Preparing the Dough
Start by placing all-purpose flour in a large mixing bowl and gradually add water while kneading to form a soft, elastic dough. The dough should not be sticky or too dry. Let it rest for at least 30 minutes covered with a damp cloth to improve elasticity and make rolling easier.
For best results, knead the dough for 8-10 minutes until smooth. Adding a teaspoon of oil can make the dough slightly softer and easier to shape, especially when using a manual momo maker.
Preparing the Filling
Vegetarian Filling
Chop all vegetables finely and mix them in a bowl with minced garlic, ginger, soy sauce, salt, and pepper. To enhance the flavor, lightly sauté the mixture in a pan for 3-5 minutes before using it in the momo maker. This step ensures that the filling is soft and releases its natural juices, which helps in sealing the momos properly.
Non-Vegetarian Filling
For meat-based momos, combine minced chicken, pork, or beef with finely chopped onions, garlic, ginger, soy sauce, salt, and pepper. Mix thoroughly until the ingredients are evenly distributed. Marinating the meat for 15-20 minutes improves taste and helps retain moisture during cooking. Avoid overmixing, which can make the filling dense and dry.
Filling and Portioning Guidelines
Proper portioning ensures uniform cooking and an attractive appearance. Use a small spoon or measuring scoop to place filling in the center of each dough circle. Overfilling may cause the momo to burst, while underfilling makes it hollow and less flavorful.
| Dough Circle Diameter | Filling Amount |
| 7 cm | 1 teaspoon |
| 9 cm | 1.5 teaspoons |
| 11 cm | 2 teaspoons |
Following these portioning guidelines ensures even cooking, prevents leaking, and produces visually appealing momos suitable for steaming or frying in the momo maker machine.
Cleaning Methods for Different Machine Types
Manual Momo Makers
Manual momo makers are generally straightforward to clean due to their simple construction. After use, disassemble the machine completely, removing any detachable plates or molds. Wash each part with warm soapy water, using a soft brush to remove dough or filling residue from corners and grooves. Rinse thoroughly and dry each component with a clean towel to prevent rust formation on metal parts.
- Disassemble all detachable parts before washing.
- Use a soft brush to clean hard-to-reach areas.
- Ensure all parts are completely dry before reassembly.
Electric Momo Makers
Electric momo makers require careful cleaning to avoid damaging electrical components. Unplug the machine and wait until it cools completely. Remove detachable trays and molds and wash them with warm water and mild detergent. Wipe the main body of the machine with a damp cloth, avoiding contact with water on any electrical parts. Dry thoroughly before using again.
- Always unplug the machine before cleaning.
- Detach all removable parts for washing.
- Wipe the main body with a damp cloth; avoid electrical areas.
Automatic Momo Makers
Automatic momo makers are more complex, and proper cleaning ensures smooth operation and hygiene. Disassemble molds, trays, and conveyor belts if applicable. Wash each detachable part with warm soapy water. Use a soft brush for tight spaces and rinse thoroughly. Wipe the main body with a dry or slightly damp cloth. Regular cleaning after each use prevents buildup that could affect performance.
- Disassemble trays, molds, and belts before cleaning.
- Use soft brushes to remove stubborn dough or filling residues.
- Clean the machine body carefully to avoid water contact with motors.
Maintenance Practices to Extend Machine Lifespan
Regular Lubrication
For machines with moving metal parts, applying food-safe lubricant periodically can prevent friction and wear. Focus on hinges, sliding mechanisms, and rotating molds. Avoid over-lubrication as excess lubricant can contaminate the dough or filling.
Inspection and Tightening of Parts
Regularly inspect screws, bolts, and other fasteners. Over time, vibration and usage may loosen these components, affecting the stability and operation of the machine. Tighten any loose parts carefully, following the manufacturer’s instructions to avoid damage.
Proper Storage Practices
Store the momo maker in a dry, cool place to prevent rust, mold, and electrical damage. For manual machines, keep them disassembled or covered to avoid dust accumulation. For electric and automatic machines, cover the machine body and detachable parts to protect from moisture and debris.
Recommended Cleaning and Maintenance Schedule
| Frequency | Manual Momo Maker | Electric Momo Maker | Automatic Momo Maker |
| After Each Use | Wash detachable parts and dry | Wash trays and wipe body | Wash molds, belts, and wipe body |
| Weekly | Lubricate hinges | Lubricate moving parts | Lubricate all moving components |
| Monthly | Inspect screws and fasteners | Check screws, bolts, and electrical connections | Full inspection of mechanical and electrical parts |
Related Products
Copyright © Shanghai Chengtao Machinery Co., Ltd. All rights reserved.  Food Machinery Manufacturers
Contact Us